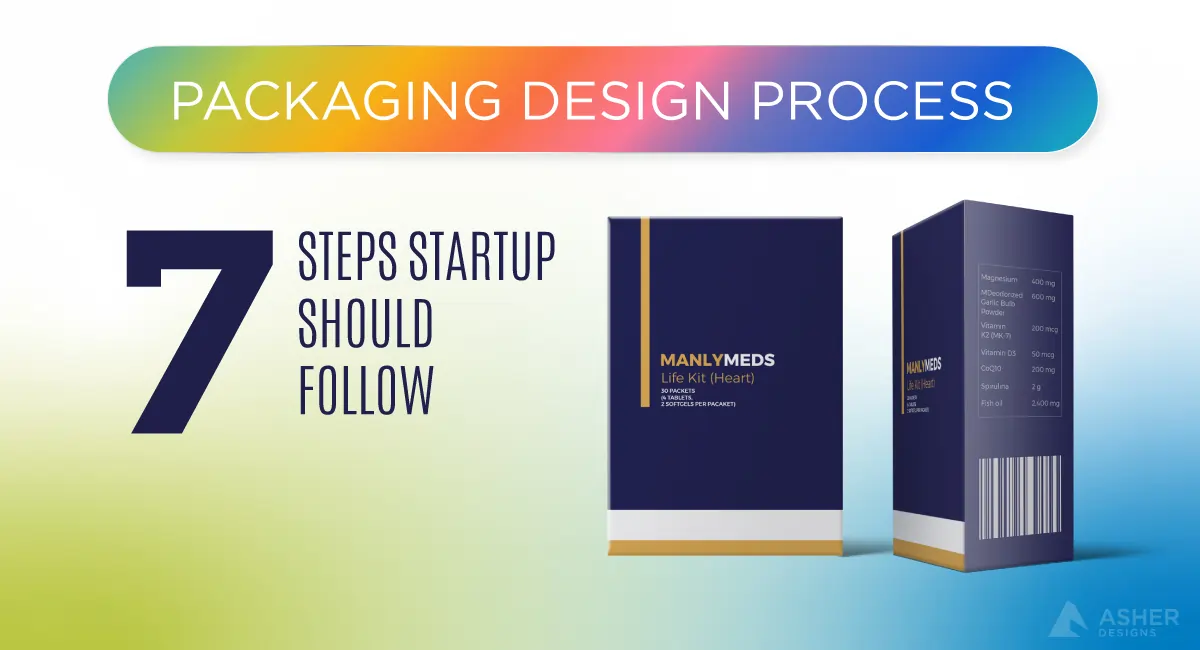
TL:DR: Not sure how to package your product as a startup? From defining goals to building dielines and testing real-world mockups, this step-by-step guide walks you through a lean, practical packaging design process. You’ll learn how to make packaging that feels intentional, looks on-brand, and fits your budget. Perfect for early-stage founders who want their product to stand out without wasting time or money.
Picture this: your product is finally ready after months of late nights and messy whiteboard sessions. You’re excited. But then, reality hits. You have no idea how to package it literally. You google “packaging design process steps”, and suddenly, you’re knee-deep in articles that feel like they were written for Fortune 500 teams with six-figure budgets. Sound familiar?
You’re not alone. A lot of startups and creative founders feel stuck right here. Packaging feels like a luxury, not a priority. But here’s the truth: innovative packaging isn’t a cost. It’s a launch weapon. It shapes how people see your brand before they even touch your product. It can make you look credible, fresh, or forgettable. In this guide, I’ll walk you through a startup-friendly, step-by-step packaging design process that helps you stand out without burning through your runway.
Why Packaging Design Matters for Startups
If you’re bootstrapping a business, every design decision feels like a juggle between survival and ambition. I get it. But think of your packaging as your brand’s outfit on a first date. People judge it within seconds, and that judgment decides if they pick you off the shelf or keep walking.
Your packaging isn’t just a container. It’s a key part of your brand strategy. It acts as a first impression, a brand narrative device, a conversion tool, and a trust signal for first-time customers.
Studies show that 72% of consumers say packaging design influences their buying decisions.
Think about Glossier or Drunk Elephant. Part of their success came from how the unboxing experience (the customer’s emotional first impression when opening a product) felt shareable and personal. I once worked with a small skincare brand that shifted from generic tubes to kraft paper wraps with handwritten labels. Their repeat orders jumped 40%. Packaging made them feel real.
Good packaging = brand memory. Insufficient packaging = a one-time click.
👉 *Related: *Types of Graphic Design Services
Step 1: Define Your Packaging Goals and Audience
Startups often jump into design tools and mood boards before asking fundamental questions like who we are designing this for and how it should make them feel when they see or hold it for the first time. Without clarity on your audience and emotional goal, even beautiful packaging can fall flat. You’ve got to start with empathy, not just aesthetics.
Your packaging goals should align with where your business stands and how your customers think when they interact with your product. Are you trying to stand out in a crowded retail aisle or spark delight for unboxing experiences? Are you launching one hero SKU or juggling a dozen?
You may be targeting eco-conscious buyers or impulse shoppers browsing online. Your strategy needs to reflect those real-world moments. That’s how you turn packaging into a powerful brand cue, not just a box.
Ask yourself:
- What’s our budget?
- Is this for ecommerce or retail?
- What emotions should this packaging spark?
- How many product sizes do we need to support?
A subscription coffee brand might want a calming, sustainable vibe. A shelf-ready snack needs boldness. Define your intention. Don’t just design for looks. Design for outcomes.
🧠 In conversations with investors or accelerators, refer to your packaging as part of an MVP packaging design strategy, signalling a lean, iterative, and scalable approach. It shows you’re thinking lean and strategic.
A quick tip: Write a short packaging brief — not fancy, just focused. Include your mission, materials you’re considering, tone, and goals.
Step 2: Research Competitors and Market Positioning
Now, it’s time to evaluate the competitive landscape with sharper eyes. Don’t just mimic what others are doing. Study their packaging formats, colour systems, messaging tone, and layout flow. Look for emotional gaps, missed storytelling opportunities, or packaging tropes that feel overused. That’s where your brand can create contrast and stand out.
Look at:
- Direct competitors: What colours, materials, and shapes are they using?
- Indirect players: What works emotionally?
- Trends: Are people going minimalist or maximalist like the “chaos packaging” trend?
I once helped a startup in the sparkling beverage space. Everyone else was doing shiny neon cans. They went with matte pastel, and it screamed boutique health — exactly what their audience wanted.
Use packaging design research tools like Pinterest for visual trends, The Dieline for industry benchmarks, and Amazon product listings for market positioning insights. Snap screenshots. Create a “no list” of what you won’t do.
The key phrase to keep in mind is competitive packaging analysis.
Pro Insight: Look for “white space” in tone or story. If no one’s telling an eco-conscious or humorous story, you should.
Step 3: Integrate Brand Identity into Packaging Design
This is where packaging finally starts feeling like your brand, not just another container. Every element, from your colour palette and typography to materials and messaging, should reflect your brand personality. When everything aligns visually and emotionally, you build brand trust. And that consistency turns first-time buyers into brand believers.
If your brand identity is playful, don’t go for a clean grayscale. If it’s luxury, don’t use thin stock or inconsistent printing.
Pull from your logo, font system, colour palette, and visual identity system. Does your mission show up on the side panel? Does your font match your Instagram tone?
I’ve seen sustainable startups use kraft materials with custom stamps to express their earthy mission, which is simple, affordable, and deeply on-brand.
Visual consistency = trust. And trust is what makes a first-time buyer a second-time customer.
Step 4: Choose the Right Packaging Type and Materials
Let’s talk boxes, wraps, inserts, and mailers, and how your packaging can complement other print marketing materials. This step often feels overwhelming because the options seem endless. But if you’re a startup, the most brilliant move is to narrow choices around two things: your budget and the experience you want customers to have. Focus on how packaging supports your brand values, protects the product, and creates a moment worth remembering without draining your budget.
Ask:
- Do we need primary and secondary packaging?
- Can we use recyclable or reusable materials?
- Do we need it to be retail-ready or mailer-friendly?
One jewellery startup I consulted used cotton drawstring bags with a paper wrap instead of boxes, Which cut their packaging cost by 40% and felt more intentional.
Startups don’t need expensive packaging. They need innovative packaging.
Use terms like “sustainable starter packaging” and “budget-friendly packaging types” when sourcing materials. Sites like noissue offer low-MOQ custom wraps, tapes, and stickers.
Step 5: Design the Visual Layout and Dielines
This is the fun part, but it’s also where a lot of beginners get stuck. You’ve got the vision, the product, and the vibe, and now you need to translate that into a real, printable box. That’s where dielines come in.
Dielines are your packaging blueprint. They show where folds, cuts, and glue lines go. You can download free dieline templates from sites like Packly and Packmojo or even use beginner-friendly Canva layouts. The key is to choose one that matches your packaging type, then design it with intention.
Here’s what to include:
- Logo placement (top, front, inside?)
- Key messaging or brand promise
- Ingredients, barcodes, and legal info
- Any icons (eco, handmade, cruelty-free, etc.)
Typography hierarchy matters, too. People should instantly know what the product is, who it’s from, and what makes it different.
I always prototype visually before print. Annotated dielines help you catch issues before spending anything.
🧠 Tools: Illustrator + Adobe Dimension or free ones like Boxshot Lite
Step 6: Build Packaging Mockups and Run Real-World UX Testing
Don’t wait until you’ve ordered 1,000 units to realize your packaging doesn’t connect. It’s a costly mistake, especially for startups running lean. Instead, test early and often. That way, you can spot issues before they snowball.
Even a rough mockup makes a difference. Print your design. Wrap it around a cereal box or something close to your real packaging. Hold it in your hands and check the feel, scale, and readability in real-life lighting.
Now, go beyond your own opinion. Hand it to friends, early users, or even random shoppers at a local market. Their honest, gut-level reactions can uncover confusing layouts, missing info, or visual turn-offs. That quick feedback loop helps you iterate smarter before spending on a full run.
Startups should:
- Print mockups at home or use short-run printers
- Send samples to friends or early buyers
- Watch reactions — don’t just ask for feedback
I had a pet food startup do a mini-launch at a local market. The feedback was gold. People loved the design but couldn’t find the feeding instructions. We fixed it within a week.
Prototyping = real-world UX testing.
Step 7: Finalize, Print, and Launch Confidently
You’re almost there. Now comes the polish, the part where small details create a significant impact. This is your last chance to catch visual alignment issues, fix minor layout flaws, and ensure everything looks intentional.
Don’t rush it. Double-check your colours, spelling, and sizing on the dieline. Use this stage to make sure your packaging feels as premium, clear, and on-brand as you imagined. You’re not just printing a box. You’re delivering a brand experience.
Run a prepress checklist:
- Are all files in CMYK?
- Did you embed fonts?
- Are barcodes correct?
Find a printer that works with small MOQs (Minimum Order Quantities is ideal for startups testing the waters through vendors like Noissue or Packmojo). Many startups choose regional printers to save on shipping. Always order a test run.
Delays happen. Print timelines are longer than you think, especially around holidays.
Packaging isn’t done until it’s shipped and stunning.
Avoid These Common Packaging Design Mistakes for Startups
Even great ideas can crash and burn if the packaging is rushed or misaligned. Startups often underestimate this part, and that’s where avoidable mistakes creep in.
Below are some rookie packaging missteps I see all the time, and if you know what to watch for, you can dodge them early and save both money and stress.
- Overdesigning: Trying to fit too much in a small space. Breathe.
- Skipping testing: Real-world feedback is more honest than yours.
- Using non-recyclable materials: This turns off a growing eco-conscious market.
- Inconsistent branding: Don’t mismatch colours from your website to your box.
Mistakes are part of the journey, but packaging doesn’t have to be painful.
Final Thoughts: Packaging Design Is an Investment, Not a Cost
You’ve got one shot at a first impression. Packaging is how you turn scrolls into sales and one-time buyers into loyal fans. It tells people you care that you’re real. That your product is worth their trust.
Start small, stay intentional, and test often.
You’ve got this.
👉 *Next step: *Explore all Types of Graphic Design Services
Or grab the free template and sketch your packaging brief today.